This tutorial was written by me on 04/28/2014 and assumes you have
working knowledge of PSP. Any simularities to other tuts is purely
coincidental and not done on purpose.

For this tut you will need:
PSP - I use version X3 but most versions will do
PSP - I use version X3 but most versions will do
Tube of choice - I'm using the artwork of Anna Liwanag. You can buy it from CDO
Do not use this tube without purchasing a license first.
ScrapLHD_AmyMatthews-AprilFreebie cluster frame
Do not use this tube without purchasing a license first.
ScrapLHD_AmyMatthews-AprilFreebie cluster frame
Mask 4 from Chrissy Chaos
Font of choice, I used Monika
DBS Flux Bubbles
VM Natural Sparkle
Eye Candy 4000 Gradient Glow or any other filter with a gradient glow
Let's begin, remember to save often.
Open cluster frame in psp. Duplicate and close the original. Delete the credits layer. Add a new raster layer and drag it to the bottom. Activate the frame layer again and resize the frame 85%, all layers unchecked.
Change your foreground to a medium color from your tube or frame, I used #e06e82. Change your background to a matching lighter color, I used #e6b4ae. Click on your foreground color and make a foreground-background gradient with angle at 45, repeats 1, style linear. Add a new raster layer. Use your selection tool to draw around the black square part of the frame. Flood fill with your gradient and deselect. Drag this layer below your frame layer and duplicate. On the duplicate go to DBS flux, Bubbles and apply the filter with the settings of 30, 50, 17, 100.
You'll notice part of this layer now extends outside the frame, that's ok we'll fix it in a bit. With the bubble layer still active, change the blend mode to overlay. Activate the original flood filled layer. Select all, float, defloat, invert selection. Activate the bubble layer above it and press delete. Deselect. Merge down 1 time. With this layer still active, go to VM Natural and apply the Sparkle filter with these settings.

Apply the sparkle filter again, but move the random slider. Doesn't matter the number, just move it. I applied the sparkle filter to my frame one time also, but this is optional.
Activate the frame layer, give it a drop shadow of 0, 0, 60. 10.
Activate the frame layer, give it a drop shadow of 0, 0, 60. 10.
Copy your tube and paste as a new layer. Move your tube layer under the frame layer. Arrange her where you want her to go as if she was on top. Give the tube a drop shadow of -3, 3, 60, 10. Repeat the drop shadow at 1, -1, 50, 5.
Now I noticed part of the tube was sticking out below the bottom of the frame, just use your selection tool to get rid of that. Keep the tube under the frame layer, we'll fix it before we're done.
Now I noticed part of the tube was sticking out below the bottom of the frame, just use your selection tool to get rid of that. Keep the tube under the frame layer, we'll fix it before we're done.
Activate the raster 1 layer, should be at the bottom. Invert your gradient and change the repeats to 2. Flood fill your raster 1. Duplicate this layer, apply the DBS Flux, Bubbles filter again with the same settings. Change blend mode to overlay and merge down 1 time.
Add mask from image, merge group. Optional, click on your raster deform tool and drag the left and bottom nodes in so the mask is more evenly centered around your frame. With this layer still active, click on your crop tool and crop layer opaque. Make sure you're not cutting off any part of your tube, frame or drop shadows.
If you're going to resize your tag, now is the time to do it. I resized mine 80%, all layers checked.
Now activate your tube layer. Using your selection tool, you're going to draw around all parts of the tube that you want to sit on top of the frame, like so:

Make sure you won't be cutting off any drop shadows. Once you have your selection drawn, promote selection to layer. Activate the original tube layer and press delete. Deselect. Activate the promoted layer and bring this layer above the frame layer.
Add your copyright, license info and tagger's mark.
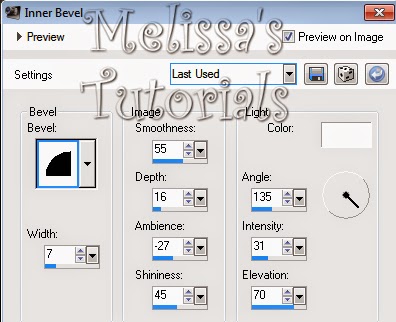
Change your foreground and background back to the solid colors you started out with. Add your name and give it an inner bevel, I used this one:
Add your copyright, license info and tagger's mark.
Change your foreground and background back to the solid colors you started out with. Add your name and give it an inner bevel, I used this one:
Then give it a slight gradient glow with the glow width at 3 and on color tab click on Medium and change it to a pale color from your tag. I used #fad0c9. Then apply a drop shadow of -2, 2, 50, 8.
Merge visible and save as a png or merge all and save as a jpg. Congrats, you're done!
Merge visible and save as a png or merge all and save as a jpg. Congrats, you're done!
No comments:
Post a Comment